Wednesday, August 20, 2008

Witch Pencils - Class Gift


I know I've already shown this idea...well sort of. This time I have wrapped the felt around a pencil and added a tag. I think I will make these for Natalie's kindergarten class for Halloween.

Thursday, August 14, 2008

Pancake Cups - Yummy!


I visited Todays Creative Blog a day or so ago like I do just about everyday and I saw Sycamore Stirrings website(http://sycamorestirrings.blogspot.com/). She has some very creative food ideas that my child will love!

This morning we tried the pancake cups. They are a lot of fun and so easy to make. I love fun and easy!! I should have photographed them on a little nicer plate but they were so yummy I was doing good to get this shot :). Preheat oven to 350. Then all you do is get some microwave pancakes and microwave them like you normally would in the microwave to make them flexible. Then smoosh them down in the muffin cups to make little pancake bowls. Bake for about 3 to 4 minutes. Take them out and fill them with whatever you would like. We did strawberries and whip cream. Wouldn't these be adorable for a brunch on a cupcake stand? I think so.

Tuesday, August 12, 2008

Halloween Costume - Button


Lately I've been thinking about halloween and the costume ideas started moving around in my head. I want to think of something unique and exciting but also something that isn't uncomfortable for Natalie. I remember when my mom was little she would always make our costumes. My favorite of all time was when she dressed my twin brothers as a pack of doublemint gum. She got a big box and painted in to look like the gum and made aluminum foil hats for them. I can't find any pictures but they looked adorable. Of course I'm sure they weren't quite comfortable having to walk around together in a big box but they did win best costume that year at the school halloween fair. I created a costume for Natalie a couple years ago and it is still my favorite. I took green floral wreaths, fabric, yarn, cardboard and safety pins to create her Button. I think she looked "Cute as a Button". Now to start thinking of ideas for this year. Hopefully something will pop in my head when I'm trying to sleep, that's when I usually get my ideas.

Sunday, August 10, 2008

Halloween Ornament Swap - Attempts


I've been playing around with halloween ornaments for a swap I'm participating in at 2peas. I don't know if I'm going to go with any of these but they are so much fun I can't stop making them. LOL. The theme is vintage so I made some pleated orange ribbon with silver ric rac to trim a few of the items. I think ric rac says vintage to me, especially silver ric rac. I went out and picked up some sticks out of the yard to make the little broom sticks, they were super easy-I picked up sticks cut a 6X2 inch square of felt, cut fringes on it, rolled around the stick and tied ric rac around it. I think they would be cute on a halloween tree but not so sure they would be vintage. I also made a witch finger complete with spider ring. I think they are cut but not quite sure if they would be considered vintage. But don't they sort of look like icicles you put on a Christmas Tree? I think so. The witch hat glue wasn't dry yet but they are a definite maybe. They are cuter in person than they look in the pic and I'm thinking a curly wire coming out of the top with beads and a spider hanging off would be cute. The round ornament looks vintage but it isn't doing it for me, KWIM? So if anyone's reading this...which one do you like best? Check back if you like ornaments because there will most likely be more because once I get started it's hard for me to stop. LOL.

Tuesday, August 5, 2008

Sew Button on with your Sewing Machine Tutorial

This is a trick I learned in a sewing class that I thought was too good not to pass along. I hope I use the right terminology but I won't promise anything. LOL

Step 1: Put down your feed dogs on your sewing machine. I have a button on the side of my machine that I push in and the feed dogs go down. You may have to refer to your manual on this. Here is a picture of my feed dog button. The feed dogs are the things under the needle that pull the fabric through for you when you sew.


Step 2: Change your stitch type to ZIG ZAG. Almost all machine have a zig zag stitch. It looks like this on my machine - Stitch #2. Depending on the button you may also have to change your stitch length but I've never had to do this for the buttons I have sewn on.


Step 3: Place button under the pressure foot of the sewing machine like so. Try to line up the holes with the needle placement.


Step 4: Manually turn the big round button on the side of your sewing machine to make sure the needle will go through the holes of the button without touching the button. **This is extremely important. If you just start using your foot pedal at this point and the button is not lined up the needle could break and you may start crying :(. Make sure the needle will go through both holes you may have to turn the wheel twice to make sure.

Step 5: Step on the gas once you see the needle will Zig and Zag from one hole to the other on the button without touching. Stitch as many times as you want to make it sturdy.

Step 6: Remove from machine..Repeat if necessary for a button with more than 2 holes.

Step 7: Yeah! You can sew on buttons now with your machine!!!

Felt Snowman Ornament/Gift Tag Tutorial

I didn't want to be the only one without a tutorial on their blog so I put this one together last night. It's my first tutorial so be gentle :).

Step 1 - Gather your materials. You will need one piece of white felt and small piece of orange felt, ribbons, buttons, scissors, and a round object to make a circle. Mine is about 4 to 5 in in diameter but you can play around with the sizes.


Step 2: Fold the felt so you can make two circles at once and draw a circle using your round object.

Step 3: Cut out Circles. Cut out nose shape from orange felt. Cut 10 pieces of various ribbons about 4 inches in length. I like to use 2 of each type of ribbon but you could use all the same ribbon if you would like. He's your snowman make him however you want :).

Step 4: Play around with nose placement and draw different types of mouths to see which one you like best.


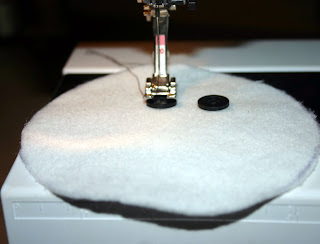
Step 5: Take one piece of white circle and sew on button eyes. You can refer to my soon to be tutorial on how to sew on buttons with your machine or sew them on by hand at this point.

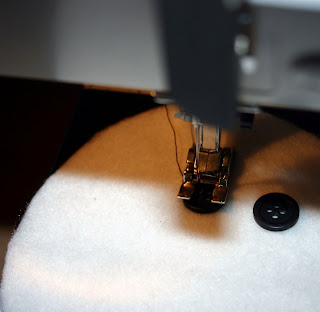
Step 6: Sew on carrot nose and sew over mouth that you drew.

Step 7: Stack 2 pieces of ribbon between the finished face circle and a blank white circle. Pin in place. Do this however many times you like. I like to do 5 sets of 2 ribbons. You will tie these two pieces together later on.

Step 8: Sew around using 1/4 inch seam allowance. Removiing pins as you go.

Step 9: Tie ribbons to form hair for your snowman.

Step 10: Enjoy! At this point you could place a wire in between middle set of ribbons to hang or place on package or bag. And don't forget, HAVE FUN!