Showing posts with label Tutorial. Show all posts

Friday, September 25, 2009

Halloween Ornament


I have officially gone batty! I created these felt bats for a swap I'm in a 2peas. I saw a bat a while back and did a screenprint for inspiration. Now I can't find the source. So if it's your idea..please let me know and I will credit you. I did a slight modification on the body shape and added a round circle under one of the button eyes to make it look a little more primitive looking. Here's how I did it.

Step 1 - Cut 2 black bat shapes out of black felt
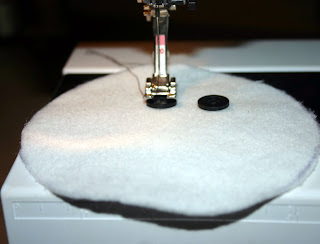
Step 2 -cut one round circle out of felt(any color but black) - I did mine in orange, yellow, and purple
Step 3 - Gather some halloween colored buttons(I used an SEI halloween button tube I had on hand)
Step 4 - Sew the round felt shape and the halloween buttons on for eyes on one piece of the black felt. (You can use my how to sew on a button with your machine tutorial if you don't know how to do this)
Step 5 - Sew on the mouth and fangs(use a contrasting thread - I used orange but white could look nice too)
Step 6 - Cut a length of ribbon for your ornament hanger(I used orange ribbon)
Step 7 - Place ribbon folded in half in between the two felt black pieces. The felt pieces should be wrong sides together.
Step 8 - Sew around the perimeter of the bat to secure in ornament hanger
Step 9 - Sew two trianges on both sides of the eyes and mouth to create a fun look.
Step 10 - Hang up your bat and let him fly.

ENJOY!


Sunday, February 1, 2009

Felt Food Tutorial - Pie Slice


I hosted a felt food swap on 2peas. My contribution was a slice of cherry pie. I'm going to attempt through pictures to show you how I made this slice of pie. Here are the components:


I used a pair of pinking shears to cut the notches in the brown felt to make it look like fancy crust.


I topstiched the brown felt onto the top of the cherry fabric trying to get the cherries to show through some of the holes in the felt.

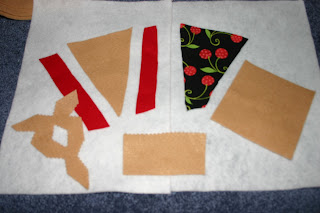
Take one of the long red pieces and put right sidestogether and sew along the outer edge.


Sew the other red strip on the opposite side.


Here's what it should look like after this step:


Now take the bottom piece right sides together and sew to one red strip. Then stretch it to the other red strip and sew it to the other side of the bottom piece.


This is what it should look like.


The end may have an opening at this point so sew straight across it to ensure it comes to a point.


After you sew across the edge,trim the excess so it doesn't bulk at the end after turning.

At this point turn the fabric and make sure you do not have any holes around the perimeter and at the end.

To make the crust take the long piece of felt and fold in half. Then take the smaller piece of felt that has been cut with the pinking shears and place on top. Sew across the top about 1/2 inch away from the pinking shear cut to hold together.

I will be back to post on how I stuffed and sewed the crust on.

Tuesday, August 5, 2008

Sew Button on with your Sewing Machine Tutorial

This is a trick I learned in a sewing class that I thought was too good not to pass along. I hope I use the right terminology but I won't promise anything. LOL

Step 1: Put down your feed dogs on your sewing machine. I have a button on the side of my machine that I push in and the feed dogs go down. You may have to refer to your manual on this. Here is a picture of my feed dog button. The feed dogs are the things under the needle that pull the fabric through for you when you sew.


Step 2: Change your stitch type to ZIG ZAG. Almost all machine have a zig zag stitch. It looks like this on my machine - Stitch #2. Depending on the button you may also have to change your stitch length but I've never had to do this for the buttons I have sewn on.


Step 3: Place button under the pressure foot of the sewing machine like so. Try to line up the holes with the needle placement.


Step 4: Manually turn the big round button on the side of your sewing machine to make sure the needle will go through the holes of the button without touching the button. **This is extremely important. If you just start using your foot pedal at this point and the button is not lined up the needle could break and you may start crying :(. Make sure the needle will go through both holes you may have to turn the wheel twice to make sure.

Step 5: Step on the gas once you see the needle will Zig and Zag from one hole to the other on the button without touching. Stitch as many times as you want to make it sturdy.

Step 6: Remove from machine..Repeat if necessary for a button with more than 2 holes.

Step 7: Yeah! You can sew on buttons now with your machine!!!

Felt Snowman Ornament/Gift Tag Tutorial

I didn't want to be the only one without a tutorial on their blog so I put this one together last night. It's my first tutorial so be gentle :).

Step 1 - Gather your materials. You will need one piece of white felt and small piece of orange felt, ribbons, buttons, scissors, and a round object to make a circle. Mine is about 4 to 5 in in diameter but you can play around with the sizes.


Step 2: Fold the felt so you can make two circles at once and draw a circle using your round object.

Step 3: Cut out Circles. Cut out nose shape from orange felt. Cut 10 pieces of various ribbons about 4 inches in length. I like to use 2 of each type of ribbon but you could use all the same ribbon if you would like. He's your snowman make him however you want :).

Step 4: Play around with nose placement and draw different types of mouths to see which one you like best.


Step 5: Take one piece of white circle and sew on button eyes. You can refer to my soon to be tutorial on how to sew on buttons with your machine or sew them on by hand at this point.

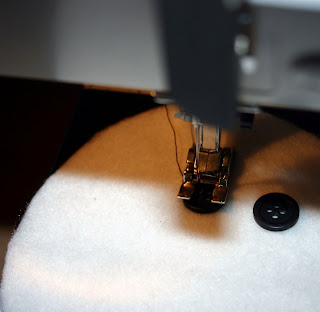
Step 6: Sew on carrot nose and sew over mouth that you drew.

Step 7: Stack 2 pieces of ribbon between the finished face circle and a blank white circle. Pin in place. Do this however many times you like. I like to do 5 sets of 2 ribbons. You will tie these two pieces together later on.

Step 8: Sew around using 1/4 inch seam allowance. Removiing pins as you go.

Step 9: Tie ribbons to form hair for your snowman.

Step 10: Enjoy! At this point you could place a wire in between middle set of ribbons to hang or place on package or bag. And don't forget, HAVE FUN!